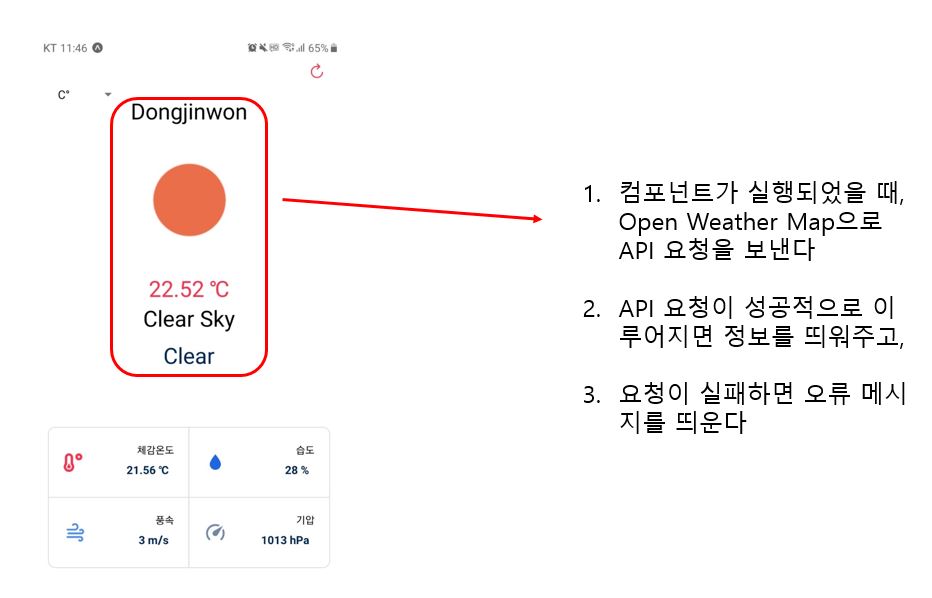
앞에서 openweathermap에 api 요청을 하였는데, 이제 이 요청들을 실제로 화면에 띄우는 부분을 만들어보자.
//날씨정보가 제대로 들어왔다면 그 부분을 보여준다
if(currentWeather){
    return (
      <View style={styles.container}>
        <StatusBar style="auto" />
        <View style={styles.main}>
        //currentweather에 담긴 날씨 정보를 데이터바인딩
          <WeatherInfo currentWeather={currentWeather} />
        </View>
      </View>
    );
  }else {
  //날씨정보가 제대로 담겨있지 않다면 errormessage를 출력한다
    return (
      <View style={styles.container}>
        <ReloadIcon load={load} />
        //errormessage state에 담긴 정보를 데이터바인딩
        <Text style={styles.text}>{errorMessage}</Text>
        <StatusBar style="auto" />
      </View>
    );
  }
간단한 if 문으로 currentWeather이라는 state에 제대로 정보가 들어갔는지 체크하고, 이를 보여주는 별도의 컴포넌트를 app.js에 넣는다. 그리고 currentWeather의 정보는 WeatherInfo라는 별도의 component로 전달해준다.
// 라이브러리
import React from 'react'
import { View, Text, StyleSheet, Image } from 'react-native'

// export한 파일들
import {colors} from '../utils/index'

//별도로 만든 style 속성
const {PRIMARY_COLOR, SECONDARY_COLOR} = colors;

//날씨정보를 보여주는 컴포넌트를 별도로 만들고 이를 export해준다
export default function WeatherInfo({currentWeather}) {

	//currentweather에서 받아온 정보 중에서 표시할 부분을 꺼낸다
    const {main:{temp}, weather:[details], name} = currentWeather;
    const {icon, main, description} = details;
    const iconUrl = `https://openweathermap.org/img/wn/${icon}@4x.png`

	//데이터바인딩으로 꺼낸 정보들을 화면에 찍어준다
    return (
        <View style={styles.weatherInfo}>
            <Text style={styles.weatherCity}>{name}</Text>
            <Image style={styles.weatherIcon} source={{uri:iconUrl}} />
            <Text style={styles.textPrimary}>{temp} ℃</Text>
            <Text style={styles.weatherDescription}>{description}</Text>
            <Text style={styles.textSecondary}>{main}</Text>
        </View>
    )
}
날씨정보를 보여주는 별도의 component를 만들어주고, 이를 export한 뒤, app.js에서 import 해준다. 그리고 currentweather에서 꺼낸 정보들을 데이터바인딩으로 찍어준다.
'Projects > React Native 위치 기반 날씨앱' 카테고리의 다른 글
| #5. 디테일한 날씨정보 띄워주기 (0) | 2021.05.19 |
|---|---|
| #4. API 요청 중 로딩 화면 구현 및 새로고침 버튼 (0) | 2021.05.19 |
| #3. 단위환산에 따라 다른 정보 표시하기 (0) | 2021.05.19 |
| #1. 날씨앱 메인 화면 구성 (0) | 2021.05.19 |
| #0. 위치 기반 날씨앱 개요 (0) | 2021.05.19 |


